
Awesome reply! So, I completed the install of the heated handgrips in about 2-1/2 hours yesterday. I give it a 2.5 beer job (out of 5). These were installed on a 2015 SGS, with stock bars. You do have to remove a lot of stuff to get this job done. The handgrips, HD PN 56100034/$162 at Surdyke.com come packaged with right & left grip, end plug for the throttle side grip, a jumper harness cable, and install instructions. Prior to install, I checked out a lot of different sources on the web and reviewed my service manual often, and hi-lighted the applicable portions. You will need the manual to assist in removal/assembly of all of the peripheral pieces, i.e.: fairing, and proper torques specs. Some of what I learned:
• You will need to digest the included instructions down to your bike model.
• Prior to dis- assembly, I marked all of the existing handlebar and control positions. I wanted to make sure that when I put everything back together it was adjusted as it was before.
- • The jumper harness cable included in the package was not used with my bike application. In the instructions, this cable is referred to for 2008- 3009 models.
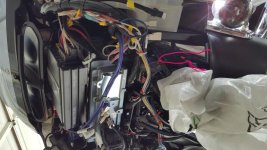
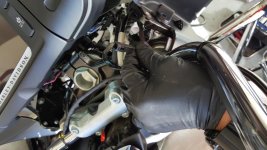
• One of the more challenging things was to locate the Heated Handgrip Power Inter Connector (Behind front fairing, lower right- if facing the bike, red
string tied around it in photo), and the Throttle Position Sensor (TPS) harness (Behind inner fairing, right side, comes from hole in bottom of handlebar-
not visible until fairing is lifted. Both of these were already attached within the fairing of my bike- I did not have to wire anything in, plugs were there.
I cannot speak to the other models or your particular bike, or any other HD grip types. See photos below for locations on the bike.
• You do not need to remove the handlebar switch housings completely from the bike- loosen them enough to remove the existing hand grips. I had
removed the clutch and brake reservoir assemblies, as per instructions, but after doing this, I found it may not be necessary. Just loosen them and if you
find they are cumbersome, then remove them. It’s no big deal. Either way, I did not have to cut any existing zip-ties.
• I did have some small amount of difficulty re-installing the left handlebar switch housing. I got it on and upon checking it, found that the odometer reset
button was not operating (wouldn’t push down and spring to return position). I CAREFULLY re-assembled and checked to make sure it was working- be
careful, a lot of little plastic pieces in there.
• Installing the throttle side grip was fairly easy however, you do have to play around with getting the two- pronged electric pin situated just right to plug
into the end of the TPS. Just be careful as those 2 little metal posts on the grip look fairly fragile. I used a little bit of di-electric grease on all connectors
before plugging them in.
• Once installed and BEFORE putting everything back together, CHECK YOUR WORK! Check handgrip heating operation, AND check to make sure that the
grips are wired properly and operate only when the bike is turned on. Zip-tie any wiring if necessary- though I didn't need to.
• I sort of wish I would have gone ahead and ran the existing handlebar switch control wires through the bars for a cleaner look, but my reviews showed
that you have to remove the harness plug (remove all of the wire ends from the plug receptacle, snake wires, replace all pins/ends), to get the wiring
through the bars and I didn’t want to go to that level. However, it looks like
paul65k was able to do this without removing the wires. This is good
news because if I want to change the bars out in the future (12” black Chubbies), I know it’s something I can handle. Dealer wanted 2.5 hours labor @
$100/hour to do this job. Though there is something to be said for that- warranty. If these grips fail, it's me that has to rip the bike apart to replace. From
what I observed, I think I can remove the lower forks to do a front end mod without removing the handle bars.


