Header Install

yegg

Member
Sep 18, 2015
235
0
16
OK, I'm fairly handy, not a mechanic, but do OK. I still consider myself a tradesman even though I wear a suit full time now.

How hard and what kind of pitfalls am I looking at if I try and replace my headers this winter? I did my slip ons (CFRs) and love them. I'm 99% sure I am going to go with the HD Screaming Eagle Stage 1 air cleaner (look for another post about that). I am also pretty sure that I am going to opt for the V&H Dresser Duals to match up with my CFRs.

Any and all advice is welcome including how to choose or why to choose other head pipes.
 
Be patient, mock-up everything loose before snugging up the bolts, you may or may not need a second set of hands to line up everything just where you want it. That's all there is to it.
 
Thanks! I did manage to find one video with a similar setup and it looked pretty straight forward. It looks like I am going to have a winter project as long as I can hide the money from the wife.
 
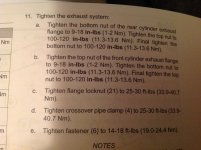
It may not be a bad idea to replace the gaskets while you're at it. I installed the Screamin Eagle gaskets with my dresser duals. Be sure to retorque them (including the heat shields) after you've ridden for a 100 miles or so. I had to do this twice and now all is good. There's also a specific process for torquing which is:
 

Attachments

  • image.jpg
    image.jpg
    59.1 KB · Views: 0
Last edited:
yegg ..... I'm considering a similar setup and install for this coming winter, V&H Dresser Duals, Rinehart 4", and SE Agitator A/C ....

I already have the FP3 installed and mapped for my stock SGS.

Did you complete your install last winter? If so, how'd it go? Any issues, tips. trick, recommendations?

Thanks
 
Yup, I finished.

The A/C was a no brainer. I did have to take it off after I put it on because I forgot about the bracket behind it. If you have to take it off, there is no need to remove the tank. Just loosen the two screws by the seat and stuff a few rags under it to hold it up. You can then get to the screws holding the bracket.

Get new gaskets for when you replace the headers. Put them in the freezer over night before using them. They will shrink slightly and be easier to install. I used a 6 inch bolt and washers to make a tool to place them in evenly. I think I used four 3/4" diameter washers to fit the inner diameter of the gaskets and two 2" diameter washers as the "push face."

Take note that when you install the headers, the flange does not sit flat against the face of the cylinder. That really confused me. Oh, and the bolts on the front cylinder are a pain in the ass to take off and put back on. Make sure there are no kids around to learn new words and word combinations.

Lay out the headers on the ground first and figure out how it all sits before attempting to start. To be honest, I did not find it as easy as everyone says. I took my time, stopped drinking beers after the second one, and test fit everything before snugging.

I wound up with a bit of a problem with the right muffler sliding on but I got a neighbor to hold the bike as i muscled it on.

I hope that helps.
 
I'm about to revisit my install.. Interesting tip about freezing the gaskets. The flanges seem to sit much further out on the heads with the slimline duals than the stock headers did. I feel like I have a slight leak and am beginning to see some faint bluing on the rear header heat shield at the flange. I'll post some pics.. Maybe you someone here can help? I think I might be over thinking the whole thing. I tried smoke and soap water to find leaks.and got nothing. But I do smell exhaust at times when at a stop.
fa451d8fef8ba4dd8471a2061552fd92.jpg
efcf899b3fdf460df6f4eb305ee355cf.jpg
ee101617d301b4c2f3c94ec9c474dfcf.jpg


Sent from my iPad using Tapatalk


Forum statistics

Threads
7,970
Messages
69,208
Members
15,056
Latest member
Clive Miller