Any one install HD heated grips?

14 FLHX

New member
Oct 3, 2013
0
0
0
www.beyondsynthetics.com
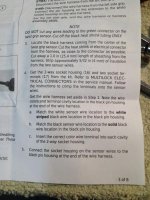
Directions are absolutely horrible.

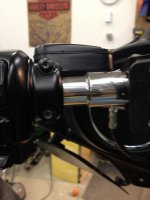
First question is, left grip dont go on all the way. It seams like there is some yellow crunchy stuff in there. Should i tap it all the way on?

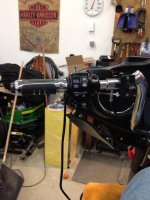
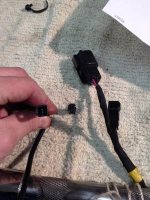
Second question, left center wire is feed threw the center of the bars, stock wiring has the heated grip connection already. They are both female connectors and from what im reading is you cut the one end off and add a male end so they connect to each other. Is that right?ImageUploadedByTapatalk1418762042.962484.jpgImageUploadedByTapatalk1418762054.966327.jpgImageUploadedByTapatalk1418762066.669645.jpg
 
Last edited:
I just installed mine last week on a 2014 SGS......I used the factory Aileron heated grips.

I agree the directions were freaking awful here so let me see if I can add some tips based on what I learned doing the install;

There are 2 basic circuits, 1 is the circuit that runs between the 2 grips and the second is the power circuit.

The circuit between the grips is pretty easy.....you simply run the wire from the left grip (the one inside at the end of the grip through the bars. The wire from the throttle grip is already wired and part of the throttle wire assembly. you will need to remove the little black cap at the end of the electronic throttle assembly, remove the cover at the end of the grip. You will plug the little wires there into the end of the throttle assembly (need needle nose pliers here) after you slide on the grip, line it up on the throttle assembly in the position you like and then pop the end of the grip back on.

You will need to eventually connect these 2 wires from the grips together and this is done by stripping back the wire in the throttle loom, and replacing the plug there as outlined on page 3, #3 in the supplied directions. You basically need to crimp on the 2 supplied pins, after removing the factory connector which will allow the cable from the left grip to be connected.

Then you will need to modify the left hand grip by notching out a piece of the grip in the channel near the end that goes into the switch housing, then feed it through the switch assembly and out the other side where the wiring harness exits. If your bars are drilled you can run the power wire through the bars (There is room) or run the power wire along with the external wiring by bundling with the switch housing wire and re-attach to the bars with the supplied wire ties.

Once you have all that you'll need to remove the gas tank and either relocate it to the seating position (with shop towels or a cover) and remove the plastic center channel where all the existing wires are currently run and run it to the back of the bike as you will eventually be connecting it under the left rear cover.

Now you will need to install the Electrical Connection Kit, Tour (69200722) which will supply both the switched power, hot lead and ground and as a benefit you will also get an accessory plug for future things like a heated seat as was standard on models through 2013. (this is a $25 part). Make the proper connections, button it up and they should work...............it was a bunch of work.

In hindsight it is one of the few times that the one hour labor quote from the dealer would have been an EXCEPTIONAL deal.......if you haven't installed them yet I suggest that you call your dealer and ask they fee to install........after the fact $100 would have been a good deal for me to have them do it.

I am very happy to have them however and they were VERY welcome on the 300 mile ride home Sunday with 40 degree temps :D
 
Thanks Paul. Awesome right up, you did better then HD did.


Still one question tho, was your left grip hard to press on the last 1" I have a gap and when it press it on it soundzs like crunching and it dont sound right, i took a flashlight and looked up in there and its some yellow crunchy stuff.
 
Thanks Paul. Awesome right up, you did better then HD did.


Still one question tho, was your left grip hard to press on the last 1" I have a gap and when it press it on it soundzs like crunching and it dont sound right, i took a flashlight and looked up in there and its some yellow crunchy stuff.
No mine went right on and did not need extraordinary pressure. I was also installing the 2" reduced reach handlebars though so there was no residual on the left side from removing the old grips.

I would suggest that you take it off and try to clean out the groove inside the grip with a ling thin device.....like maybe a thin pick or possibly a thin flat head screwdriver....hope this helps!
 
Last edited:
Great instructions paul65k- ahhhh, I think I'll just wear "thicker" gloves, lol :rolleyes:
 
Great instructions paul65k- ahhhh, I think I'll just wear "thicker" gloves, lol :rolleyes:
I agree with Mojo. When I asked about insulation at my HD shop I think that it was either 2 or 3 hours to install, that put the cost of heated grips over $500.
 
Thinking I will go with the heated gloves you just plug them into the power port. "LOL" May save me from throwing another wrench at the wall.
 
I upgraded mine on the 2015 SG. Very easy since the connectors for everything were provide under the fairing. Maybe took me an hour only because of learniing curve and being extra careful not to scratch anything.
 
I upgraded mine on the 2015 SG. Very easy since the connectors for everything were provide under the fairing. Maybe took me an hour only because of learniing curve and being extra careful not to scratch anything.
Sounds like I might have done a bunch of extra work installing the accessory harness and running the power back to the connector........again the HD instructions were not well written......Imagine that :rolleyes:
 
Claysin, I have a 2015 also. Are you saying that there is no need to remove the tank and run power? Everything is provided up front in the fairing? Did you have to notch the left grip like paul65k? Thx..
 
If you buy the acc harness from Harley, it's easy.
3 minutes to take the tank off. Run the wires with the rest of the factory wires.

Notch the left grip? What are you talking about?
 
In his install post earlier in this thread, Paul65k said at one point, you will need to modify the left hand grip by notching it to run the wire..... Not sure what he meant by that
 
I installed mine on a 2015 sgs this week. The instructions sucked. I removed more things then needed. Took over 2 hours, the next time im sure it will take about a hour. I bought the accesorie kit and didnt use it waste of $25.
 
I agree with Mojo. When I asked about insulation at my HD shop I think that it was either 2 or 3 hours to install, that put the cost of heated grips over $500.

I called my local HD and they estimated 4hrs. Heated gloves option for me :)
 
I installed mine on a 2015 sgs this week. The instructions sucked. I removed more things then needed. Took over 2 hours, the next time im sure it will take about a hour. I bought the accesorie kit and didnt use it waste of $25.

Did you not use the accessories kit because there was an unused connection in the fairing? A bar change with heated grips is the next task to be done
 
Farmboy, on mine the two connecotors I needed where under the fairing. The one on the left side connector had a dummy plug that you need to remove. The right side connector is kinda hidden and shorter. I took the two pluges off the heated grip, ran weed wacker string throw the left side bar and tapped two wires to the string and pulled then throw then reinstalled the connectors.


Forum statistics

Threads
7,970
Messages
69,208
Members
15,056
Latest member
Clive Miller